Este tutorial é baseado no Intro to Django que fica na parte de baixo da página start do Django project.
Até a data deste post o Django está na versão 2.2.2, e requer Python 3.
O que você precisa?
Python 3.6 ou superior, pip e virtualenv.
Considere que você tenha instalado Python 3.6 ou superior, pip e virtualenv.
Criando o ambiente
Crie uma pasta com o nome django2-pythonclub
$ mkdir django2-pythonclub
$ cd django2-pythonclub
A partir de agora vamos considerar esta como a nossa pasta principal.
Considerando que você está usando Python 3, digite
Lembre-se de colocar esta pasta no seu .gitignore, caso esteja usando.
Depois ative o ambiente digitando
source .venv/bin/activate
Lembre-se, sempre quando você for mexer no projeto, tenha certeza de ter ativado o virtualenv, executando o comando source .venv/bin/activate. Você deve repetir esse comando toda a vez que você abrir um novo terminal.
Instalando Django 2.2.2
Basta digitar
pip install django==2.2.2
Dica: se você digitar pip freeze você verá a versão dos programas instalados.
É recomendável que você atualize a versão do pip
Se der erro então faça:
python -m pip install --upgrade pip
Instalando mais dependências
Eu gosto de usar o django-extensions e o django-widget-tweaks, então digite
pip install django-extensions django-widget-tweaks python-decouple
Importante: você precisa criar um arquivo requirements.txt para instalações futuras do projeto em outro lugar.
pip freeze > requirements.txt
Este é o resultado do meu até o dia deste post:
(.venv):$ cat requirements.txt

django-extensions==2.1.6
django-widget-tweaks==1.4.3
python-decouple==3.1
pytz==2018.9
six==1.12.0
Escondendo a SECRET_KEY e trabalhando com variáveis de ambiente
É muito importante que você não deixe sua SECRET_KEY exposta. Então remova-o imediatamente do seu settings.py ANTES mesmo do primeiro commit. Espero que você esteja usando Git.
Vamos usar o python-decouple escrito por Henrique Bastos para gerenciar nossas variáveis de ambiente. Repare que já instalamos ele logo acima.
Em seguida você vai precisar criar um arquivo .env, para isso rode o comando a seguir, ele vai criar uma pasta contrib e dentro dele colocar um arquivo env_gen.py
if [ ! -d contrib ]; then mkdir contrib; fi; git clone https://gist.github.com/22626de522f5c045bc63acdb8fe67b24.git contrib/
rm -rf contrib/.git/  # remova a pasta .git que está dentro de contrib.
Em seguida rode
python contrib/env_gen.py
que ele vai criar o arquivo .env.
Supondo que você está versionando seu código com Git, é importante que você escreva isso dentro do seu arquivo .gitignore, faça direto pelo terminal
echo .env >> .gitignore
echo .venv >> .gitignore
echo '*.sqlite3' >> .gitignore
Pronto, agora você pode dar o primeiro commit.
Criando o projeto e a App
Para criar o projeto digite
$ django-admin startproject myproject .
repare no ponto no final do comando, isto permite que o arquivo manage.py fique nesta mesma pasta django2-pythonclub .
Agora vamos criar a app bands, mas vamos deixar esta app dentro da pasta myproject. Então entre na pasta
e digite
$ python ../manage.py startapp bands
A intenção é que os arquivos tenham a seguinte hierarquia nas pastas:
.
├── manage.py
├── myproject
│   ├── bands
│   │   ├── admin.py
│   │   ├── apps.py
│   │   ├── models.py
│   │   ├── tests.py
│   │   └── views.py
│   ├── settings.py
│   ├── urls.py
│   └── wsgi.py
└── requirements.txt
Agora permaneça sempre na pasta django2-pythonclub
e digite
$ python manage.py migrate
para criar a primeira migração (isto cria o banco de dados SQLite), e depois rode a aplicação com
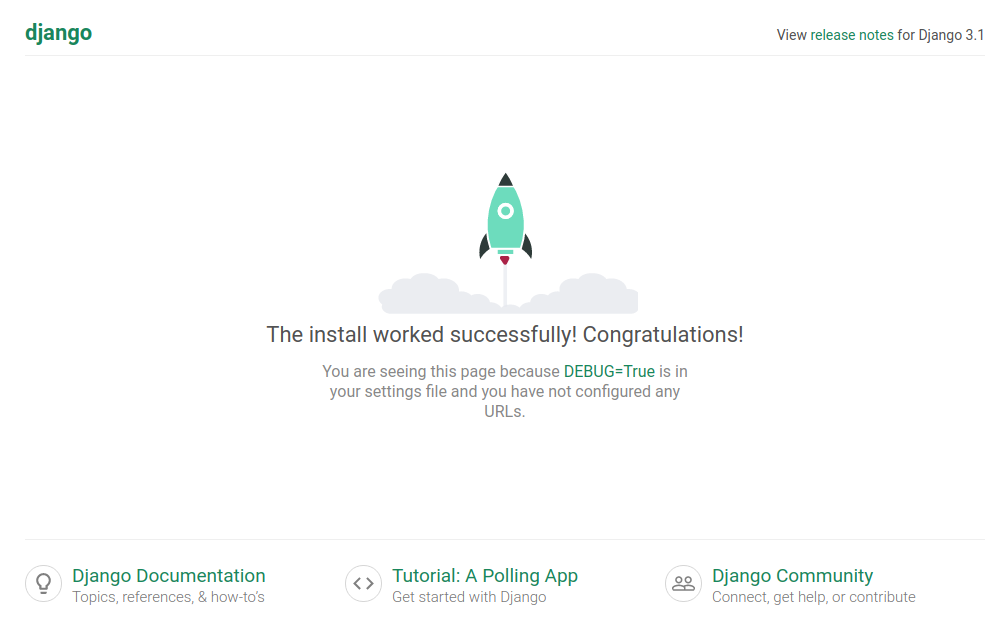
$ python manage.py runserver
e veja que a aplicação já está funcionando. Veja o endereço da url aqui
Django version 2.2.2, using settings 'myproject.settings'
Starting development server at http://127.0.0.1:8000/
Quit the server with CONTROL-C.
Editando settings.py
Em INSTALLED_APPS acrescente as linhas abaixo.
INSTALLED_APPS = (
    ...
    'widget_tweaks',
    'django_extensions',
    'myproject.bands',
)
E mude também o idioma.
LANGUAGE_CODE = 'pt-br'
E caso você queira o mesmo horário de Brasília-BR
TIME_ZONE = 'America/Sao_Paulo'
Já que falamos do python-decouple, precisamos de mais alguns ajustes
from decouple import config, Csv

# SECURITY WARNING: keep the secret key used in production secret!
SECRET_KEY = config('SECRET_KEY')

# SECURITY WARNING: don't run with debug turned on in production!
DEBUG = config('DEBUG', default=False, cast=bool)

ALLOWED_HOSTS = config('ALLOWED_HOSTS', default=[], cast=Csv())
Veja que é importante manter sua SECRET_KEY bem guardada (em outro lugar).
Então crie um arquivo .env e guarde sua SECRET_KEY dentro dele, exemplo:
SECRET_KEY=your_secret_key
DEBUG=True
ALLOWED_HOSTS=127.0.0.1,.localhost
Editando models.py
from django.db import models
from django.urls import reverse_lazy


class Band(models.Model):

    """A model of a rock band."""
    name = models.CharField(max_length=200)
    can_rock = models.BooleanField(default=True)

    class Meta:
        ordering = ('name',)
        verbose_name = 'band'
        verbose_name_plural = 'bands'

    def __str__(self):
        return self.name

    def get_absolute_url(self):
        # retorna a url no formato /bands/1/
        return reverse_lazy('band_detail', kwargs={'pk': self.pk})

    def get_members_count(self):
        # count members by band
        # conta os membros por banda
        return self.band.count()


class Member(models.Model):

    """A model of a rock band member."""
    name = models.CharField("Member's name", max_length=200)
    instrument = models.CharField(choices=(
        ('g', "Guitar"),
        ('b', "Bass"),
        ('d', "Drums"),
        ('v', "Vocal"),
        ('p', "Piano"),
    ),
        max_length=1
    )

    band = models.ForeignKey("Band", related_name='band', on_delete=models.CASCADE)

    class Meta:
        ordering = ('name',)
        verbose_name = 'member'
        verbose_name_plural = 'members'

    def __str__(self):
        return self.name
Tem algumas coisas que eu não estou explicando aqui para o tutorial ficar curto, mas uma coisa importante é que, como nós editamos o models.py vamos precisar criar um arquivo de migração do novo modelo. Para isso digite
python manage.py makemigrations
python manage.py migrate
O primeiro comando cria o arquivo de migração e o segundo o executa, criando as tabelas no banco de dados.
Editando urls.py
from django.urls import include, path
from myproject.bands import views as v
from django.contrib import admin

app_name = 'bands'

urlpatterns = [
    path('', v.home, name='home'),
    # path('bands/', v.band_list, name='bands'),
    # path('bands/<int:pk>/', v.band_detail, name='band_detail'),
    # path('bandform/', v.BandCreate.as_view(), name='band_form'),
    # path('memberform/', v.MemberCreate.as_view(), name='member_form'),
    # path('contact/', v.band_contact, name='contact'),
    # path('protected/', v.protected_view, name='protected'),
    # path('accounts/login/', v.message),
    path('admin/', admin.site.urls),
]
Obs: deixei as demais urls comentada porque precisa da função em views.py para que cada url funcione. Descomente cada url somente depois que você tiver definido a função em classe em views.py a seguir.
Editando views.py
from django.shortcuts import render
from django.http import HttpResponse
from django.contrib.auth.decorators import login_required
from django.views.generic import CreateView
from django.urls import reverse_lazy
from .models import Band, Member
# from .forms import BandContactForm, BandForm, MemberForm
Obs: Deixei a última linha comentada porque ainda não chegamos em forms.
A função a seguir retorna um HttpResponse, ou seja, uma mensagem simples no navegador.
def home(request):
    return HttpResponse('Welcome to the site!')
A próxima função (use uma ou outra) renderiza um template, uma página html no navegador.
def home(request):
    return render(request, 'home.html')
A função band_list retorna todas as bandas.
Para fazer a busca por nome de banda usamos o comando search = request.GET.get('search_box'), onde search_box é o nome do campo no template band_list.html.
E os nomes são retornados a partir do comando bands = bands.filter(name__icontains=search). Onde icontains procura um texto que contém a palavra, ou seja, você pode digitar o nome incompleto (ignora maiúsculo ou minúsculo).
def band_list(request):
    """ A view of all bands. """
    bands = Band.objects.all()
    search = request.GET.get('search_box')
    if search:
        bands = bands.filter(name__icontains=search)
    return render(request, 'bands/band_list.html', {'bands': bands})
Em urls.py pode descomentar a linha a seguir:
path('bands/', v.band_list, name='bands'),
A função band_contact mostra como tratar um formulário na view. Esta função requer BandContactForm, explicado em forms.py.
def band_contact(request):
    """ A example of form """
    if request.method == 'POST':
        form = BandContactForm(request.POST)
    else:
        form = BandContactForm()
    return render(request, 'bands/band_contact.html', {'form': form})
Em urls.py pode descomentar a linha a seguir:
path('contact/', v.band_contact, name='contact'),
A função band_detail retorna todos os membros de cada banda, usando o pk da banda junto com o comando filter em members.
def band_detail(request, pk):
    """ A view of all members by bands. """
    band = Band.objects.get(pk=pk)
    members = Member.objects.all().filter(band=band)
    context = {'members': members, 'band': band}
    return render(request, 'bands/band_detail.html', context)
Em urls.py pode descomentar a linha a seguir:
path('bands/<int:pk>/', v.band_detail, name='band_detail'),
BandCreate e MemberCreate usam o Class Based View para tratar formulário de uma forma mais simplificada usando a classe CreateView. O reverse_lazy serve para tratar a url de retorno de página.
As classes a seguir requerem BandForm e MemberForm, explicado em forms.py.
class BandCreate(CreateView):
    model = Band
    form_class = BandForm
    template_name = 'bands/band_form.html'
    success_url = reverse_lazy('bands')


class MemberCreate(CreateView):
    model = Member
    form_class = MemberForm
    template_name = 'bands/member_form.html'
    success_url = reverse_lazy('bands')
Em urls.py pode descomentar a linha a seguir:
path('bandform/', v.BandCreate.as_view(), name='band_form'),
path('memberform/', v.MemberCreate.as_view(), name='member_form'),
A próxima função requer que você entre numa página somente quando estiver logado.
[@login_required](https://docs.djangoproject.com/en/2.2/topics/auth/default/#the-login-required-decorator) é um decorator.
login_url='/accounts/login/' é página de erro, ou seja, quando o usuário não conseguiu logar.
E render(request, 'bands/protected.html',... é página de sucesso.
@login_required(login_url='/accounts/login/')
def protected_view(request):
    """ A view that can only be accessed by logged-in users """
    return render(request, 'bands/protected.html', {'current_user': request.user})
HttpResponse retorna uma mensagem simples no navegador sem a necessidade de um template.
def message(request):
    """ Message if is not authenticated. Simple view! """
    return HttpResponse('Access denied!')
Em urls.py pode descomentar a linha a seguir:
path('protected/', v.protected_view, name='protected'),
path('accounts/login/', v.message),
Comandos básicos do manage.py
Para criar novas migrações com base nas alterações feitas nos seus modelos
$ python manage.py makemigrations bands
Obs: talvez dê erro porque está faltando coisas de forms.py, explicado mais abaixo.
Para aplicar as migrações
$ python manage.py migrate
Para criar um usuário e senha para o admin
$ python manage.py createsuperuser
Para rodar a aplicação localmente
$ python manage.py runserver
Após criar um super usuário você pode entrar em localhost:8000/admin
Obs: Se você entrar agora em localhost:8000 vai faltar o template home.html. Explicado mais abaixo.
shell_plus
É o interpretador interativo do python rodando via terminal direto na aplicação do django.
Com o comando a seguir abrimos o shell do Django.
$ python manage.py shell
Mas se você está usando o django-extensions (mostrei como configurá-lo no settings.py), então basta digitar
$ python manage.py shell_plus
Veja a seguir como inserir dados direto pelo shell.
>>> from myproject.bands.models import Band, Member
>>> # Com django-extensions não precisa fazer o import
>>> # criando o objeto e salvando
>>> band = Band.objects.create(name='Metallica')
>>> band.name
>>> band.can_rock
>>> band.id
>>> # criando uma instancia da banda a partir do id
>>> b = Band.objects.get(id=band.id)
>>> # criando uma instancia do Membro e associando o id da banda a ela
>>> m = Member(name='James Hetfield', instrument='b', band=b)
>>> m.name
>>> # retornando o instrumento
>>> m.instrument
>>> m.get_instrument_display()
>>> m.band
>>> # salvando
>>> m.save()
>>> # listando todas as bandas
>>> Band.objects.all()
>>> # listando todos os membros
>>> Member.objects.all()
>>> # criando mais uma banda
>>> band = Band.objects.create(name='The Beatles')
>>> band = Band.objects.get(name='The Beatles')
>>> band.id
>>> b = Band.objects.get(id=band.id)
>>> # criando mais um membro
>>> m = Member(name='John Lennon', instrument='v', band=b)
>>> m.save()
>>> # listando tudo novamente
>>> Band.objects.all()
>>> Member.objects.all()
>>> exit()
Criando os templates
Você pode criar os templates com os comandos a seguir...
$ mkdir -p myproject/bands/templates/bands
$ touch myproject/bands/templates/{menu,base,home}.html
$ touch myproject/bands/templates/bands/{band_list,band_detail,band_form,band_contact,member_form,protected}.html
... ou pegar os templates já prontos direto do Github.
mkdir -p myproject/bands/templates/bands
wget https://raw.githubusercontent.com/rg3915/django2-pythonclub/master/myproject/bands/templates/base.html -P myproject/bands/templates/
wget https://raw.githubusercontent.com/rg3915/django2-pythonclub/master/myproject/bands/templates/home.html -P myproject/bands/templates/
wget https://raw.githubusercontent.com/rg3915/django2-pythonclub/master/myproject/bands/templates/menu.html -P myproject/bands/templates/
wget https://raw.githubusercontent.com/rg3915/django2-pythonclub/master/myproject/bands/templates/bands/band_contact.html -P myproject/bands/templates/bands/
wget https://raw.githubusercontent.com/rg3915/django2-pythonclub/master/myproject/bands/templates/bands/band_detail.html -P myproject/bands/templates/bands/
wget https://raw.githubusercontent.com/rg3915/django2-pythonclub/master/myproject/bands/templates/bands/band_form.html -P myproject/bands/templates/bands/
wget https://raw.githubusercontent.com/rg3915/django2-pythonclub/master/myproject/bands/templates/bands/band_list.html -P myproject/bands/templates/bands/
wget https://raw.githubusercontent.com/rg3915/django2-pythonclub/master/myproject/bands/templates/bands/member_form.html -P myproject/bands/templates/bands/
wget https://raw.githubusercontent.com/rg3915/django2-pythonclub/master/myproject/bands/templates/bands/protected.html -P myproject/bands/templates/bands/
forms.py
$ touch myproject/bands/forms.py
Edite o forms.py.
from django import forms
from .models import Band, Member


class BandContactForm(forms.Form):
    subject = forms.CharField(max_length=100)
    message = forms.CharField(widget=forms.Textarea)
    sender = forms.EmailField()
    cc_myself = forms.BooleanField(required=False)


class BandForm(forms.ModelForm):

    class Meta:
        model = Band
        fields = '__all__'


class MemberForm(forms.ModelForm):

    class Meta:
        model = Member
        fields = '__all__'
Lembra que eu deixei o código comentado em views.py?
Descomente ele por favor
from .forms import BandContactForm, BandForm, MemberForm
admin.py
Criamos uma customização para o admin onde em members aparece um filtro por bandas.
from django.contrib import admin
from .models import Band, Member


class MemberAdmin(admin.ModelAdmin):
    """Customize the look of the auto-generated admin for the Member model."""
    list_display = ('name', 'instrument')
    list_filter = ('band',)


admin.site.register(Band)  # Use the default options
admin.site.register(Member, MemberAdmin)  # Use the customized options
Carregando dados de um CSV
Vamos baixar alguns arquivos para criar os dados no banco a partir de um CSV.
wget https://raw.githubusercontent.com/rg3915/django2-pythonclub/master/create_data.py
mkdir fix
wget https://raw.githubusercontent.com/rg3915/django2-pythonclub/master/fix/bands.csv -P fix/
wget https://raw.githubusercontent.com/rg3915/django2-pythonclub/master/fix/members.csv -P fix/
Estando na pasta principal, rode o comando
que ele vai carregar alguns dados pra você.
Veja o código de create_data.py.
Veja o código completo em https://github.com/rg3915/django2-pythonclub
git clone https://github.com/rg3915/django2-pythonclub.git


 Artwork by